Ourdream is one of those AI tools that you just don’t know how to describe at the dinner table without a few people giving you raised eyebrows.
At heart, it is a creative AI companion for interactive fantasy, storytelling and roleplay. But that description only touches the surface.
It’s a little more like a playground for the imagination and less like a cold, functional machine. The sort of place you visit when your mind is hungry to explore stories, characters and situations that do not fit conveniently inside productivity apps or spreadsheet life. It’s silly, occasionally intense, sometimes out there – and frankly, that’s sort of the point.
I didn’t arrive expecting depth. I stuck around because of that surprise.
Ourdream: Detailed user guide
Step 1: Choose gender + visual style (Realistic vs Anime)

What you see on screen (Image 1):
- Title: Dream Girl Creator
- A label: select gender & style
- Tabs across the top:
- Female (selected in your screenshot)
- Male
- Trans
- Two big style cards:
- Realistic
- Anime
- Buttons at the bottom:
- Design with AI (left)
- Begin (right, pink)
What each option does
Gender tabs (Female/Male/Trans):
- This decides the base character category you’re creating.
- It also changes the presets you’ll see later (faces, bodies, etc.).
Style cards (Realistic/Anime):
- Realistic gives photoreal-style character art.
- Anime gives illustrated/anime-style art.
“Design with AI” vs “Begin”
- Begin: classic step-by-step wizard using presets.
- Design with AI: usually means you can describe what you want and let AI pre-fill/auto-create parts for you.
Tip: If you’re not sure what you want, pick Design with AI once just to see what it generates, then you can still tweak details manually afterward.
When ready, click Begin.
Step 2: Pick ethnicity + skin tone
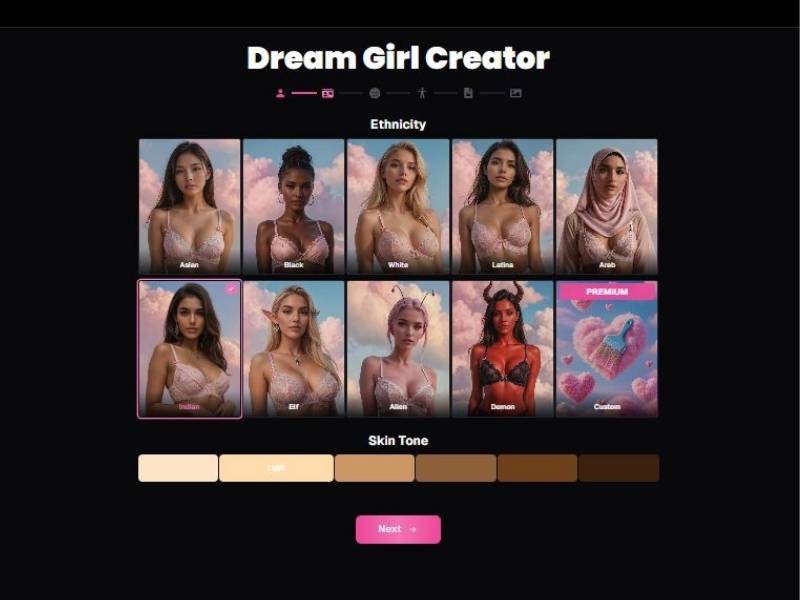
What you see on screen (Image 2):
- Section label: Ethnicity
- A grid of ethnicity tiles:
- Asian
- Black
- White
- Latina
- Arab
- Plus fantasy-style options (you can see):
- Elf
- Alien
- Demon
- A Custom tile marked Premium
- Below that: Skin Tone with a row of tone swatches (from lighter to darker)
- Bottom button: Next (pink)
How to use this screen
- Click one Ethnicity tile.
- Choose a Skin Tone swatch.
- Hit Next.
Note on Premium tiles:
Anything stamped Premium won’t be selectable unless you’re on a paid plan (or it’ll prompt an upgrade).
Practical tip:
If you want the character to look consistent later, pick ethnicity first, then fine-tune skin tone. Doing it the other way sometimes makes you second-guess your choice.
Step 3: Choose eye color, hair color, and hair style
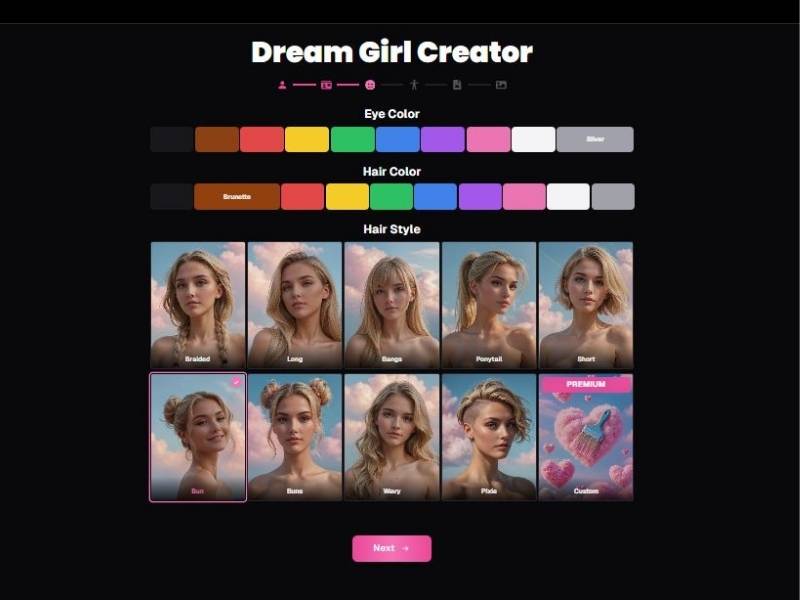
What you see on screen (Image 3):
- Eye Color row: color swatches + a labeled option visible like Silver
- Hair Color row: color swatches + a labeled option visible like Brunette
- Hair Style grid with tiles:
- Braided
- Long
- Bangs
- Ponytail
- Short
- Bun
- Buns
- Wavy
- Pixie
- And a Custom tile marked Premium
- Bottom button: Next (pink)
How to use this screen
- Pick an Eye Color swatch (example shown: Silver).
- Pick a Hair Color swatch (example shown: Brunette).
- Choose a Hair Style tile (example shown: Bun selected in one of your other screenshots).
- Click Next.
Tip that saves time:
If you’re aiming for a specific vibe (soft, bold, sporty, mysterious), pick hair style first, then match the hair color + eye color. It’s weirdly easier that way.
Step 4: Choose body type + size presets

What you see on screen (Image 4):
Three stacked sections:
1) Body Type
Tiles shown:
- Slim
- Athletic
- Voluptuous (selected in your screenshot)
- Curvy
- Muscular
2) Breast Size
Tiles shown:
- Flat
- Small
- Medium
- Large
- XL (selected in your screenshot)
3) Butt Size
Tiles shown:
- Small
- Skinny
- Athletic
- Medium
- Large (selected in your screenshot)
(Your screenshot shows the character preview tiles are stylized images; you select a preset by clicking the tile.)
How to use this screen
- Choose Body Type first.
- Select Breast Size preset.
- Select Butt Size preset.
- Move forward (in your set it’s implied you continue to the next step).
Small reality check (in a good way):
If you crank every slider/preset to the extreme, the results can look less natural. If you want “realistic,” balance matters. If you want “fantasy,” go nuts—this is literally what the tool is for.
Step 5: Name, age, and personality details
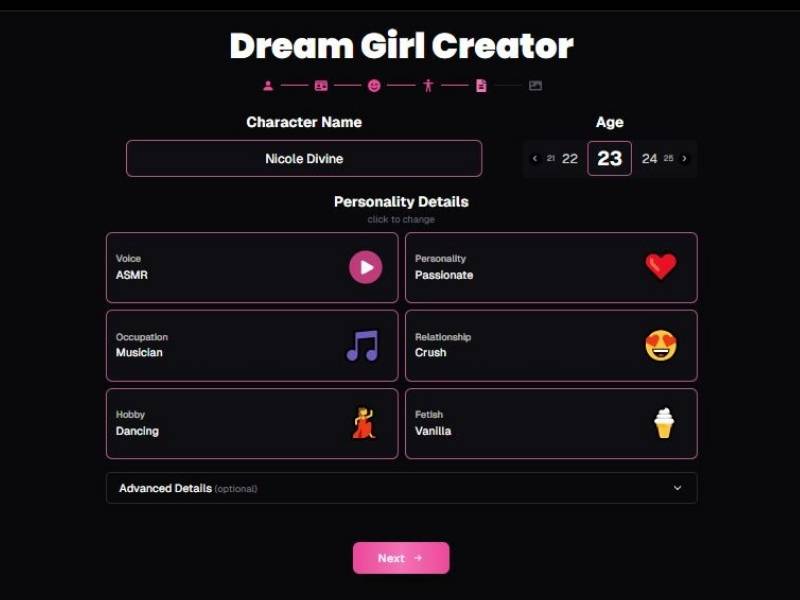
What you see on screen (Image 5):
- Character Name field (example: Nicole Divine)
- Age selector with arrows and values (example: 23, with nearby numbers like 21, 22, 24, 25)
- Personality Details section with clickable cards:
- Voice (example: ASMR) with a play button icon
- Personality (example: Passionate)
- Occupation (example: Musician)
- Relationship (example: Crush)
- Hobby (example: Dancing)
- Fetish (example: Vanilla)
- Advanced Details (optional) dropdown/accordion
- Bottom button: Next (pink)
How to use this screen (and what it affects)
Character Name
- This name appears on your character card and inside chats.
Age
- You choose from a small range using arrows (looks like it steps through ages).
- Keep it consistent if you’re building a story persona.
Personality cards
These are big because they shape:
- How your AI girlfriend talks
- Her tone and vibe in conversation
- The type of dynamic you’ll get in chat
Voice (with play icon)
- You can preview/select a voice style (ASMR shown).
- The play button suggests you can listen before committing.
Advanced Details
- Optional, but useful if you want:
- deeper backstory
- more specific preferences
- more consistent roleplay
Then click Next.
Step 6: Final review + fine-tuning (Appearance & Personality panels)
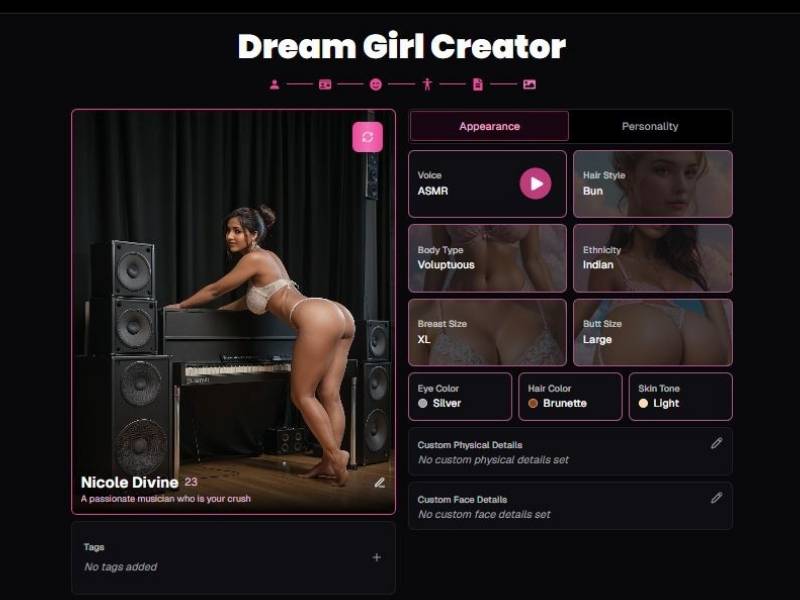
What you see on screen (Image 6):
This is the “dashboard” view where everything comes together.
Left side: Character preview card
- Big character image preview
- Name + age (example: Nicole Divine, 23)
- A short descriptor line (example text: “A passionate musician who is your crush”)
- A small edit/pencil icon near the preview (suggests quick edits)
- A small refresh/regenerate icon near the image (suggests rerolling the image)
Right side: Two main tabs
- Appearance (selected)
- Personality (tab visible)
Appearance options (shown as tiles/rows)
- Voice (ASMR, with play button)
- Hair Style (Bun)
- Body Type (Voluptuous)
- Ethnicity (Indian)
- Breast Size (XL)
- Butt Size (Large)
- Eye Color (Silver)
- Hair Color (Brunette)
- Skin Tone (Light)
Custom fields (important)
- Custom Physical Details (shows “No custom physical details set”) with an edit icon
- Custom Face Details (shows “No custom face details set”) with an edit icon
These are where you add specifics beyond presets (scars, freckles, face shape notes, etc.), which usually improves consistency.
Tags
- A Tags section with “No tags added” and a + icon
Tags help organize characters, especially if you create multiple.
How does it work?
You start by defining what you want-simple, vague, or wildly specific. A character. A scenario. A mood. Then the AI responds and adapts, learning your preferences as the interaction unfolds.
There’s no rigid “step one, step two” feeling here. Instead, it’s conversational. You push the story forward, the AI reacts, you correct it, tease it, or nudge it in a different direction. Think less prompt engineering, more back-and-forth banter.
Behind the scenes, Ourdream uses large language models tuned for immersive dialogue and continuity. In practice, what matters is this:
- It remembers context better than you’d expect
- It adjusts tone fast
- It doesn’t panic when you change your mind mid-scene
And yes, sometimes it stumbles. But so do humans. That’s part of the charm.
Core Functionalities
| Functionality | What it Actually Feels Like |
| Interactive roleplay | Like improvising with a very fast, very attentive partner |
| Story generation | Less “once upon a time,” more living narrative |
| Character creation | Surprisingly nuanced personalities |
| Memory & continuity | Not perfect, but way better than most competitors |
| User customization | You’re not stuck with defaults |
Key Features
| Feature | Why It Matters |
| Adaptive dialogue | Conversations don’t feel canned |
| Scenario flexibility | You can pivot without restarting everything |
| Personalization | The AI starts to “get you” over time |
| Safe boundaries | Important, especially for immersive content |
| Web-based access | No messy installs, just jump in |
One thing I appreciated: you’re not forced into a rigid template. Want a slow-burn narrative? Cool.
Want chaos? Also cool. Want to rewrite the whole thing halfway through because your mood changed? The tool shrugs and rolls with it.
Pros and Cons
Pros
- Conversations feel alive, not mechanical
- Strong immersion when it’s at its best
- Flexible enough for beginners and power users
- Doesn’t constantly break character
- Surprisingly emotionally aware at times
Cons
- Can occasionally lose subtle context
- Quality varies depending on how much effort you put in
- Not designed for people who want rigid structure
- Some features feel underexplained
To be fair, most of the “cons” are really just trade-offs. Freedom always comes with a bit of mess.
FAQs
Is Ourdream beginner-friendly?
Yes, but with a caveat. If you’re used to strict menus and hand-holding, it might feel loose. If you enjoy exploring, you’ll settle in fast.
Does it replace human creativity?
No. It augments it. Big difference. The best experiences come when you treat it like a collaborator, not a vending machine.
Is it safe to use?
From my experience, guardrails are clearly in place. You still have control, and that matters.
Do you need to be “good at prompts”?
Not really. Talking to it like a person works better than overthinking prompts.
My verdict
Ourdream isn’t trying to be all things to all people – and that’s why it works.
It is not a productivity tool in disguise. It’s not a fad toy that gets boring in five minutes. It occupies that uncomfortable yet fascinating middle ground where creativity, emotion, and technology meet.
Sometimes it impresses you. Sometimes it frustrates you. Every once in a while, it catches you off-guard, in the sort of way that makes you stop and wonder, huh … that was actually not terrible.
If you’re looking elsewhere for clean outputs and predictable results. Ourdream earns its spot if you’re in the mood for something that is a little wonky, a little human and truly engaging when you meet it halfway.
I didn’t expect to care. Turns out, I kinda do.