I found Candy AI thinking “yet another AI video generator – yep, must have seen a dozen.” But this one caught me by surprise.
It is a browser-based version of an A.I. that uses text prompts to create animated video clips. Imagine typing a sentence and receiving in return a brief cinematic sequence, complete with movement and graphics.
It’s got people buzzing about it because it puts video generation within reach – no insane hardware, no crazy pipelines.
How to use Candy AI Video Generator: Step-by-step guide
Step 1 – Create the Initial AI Girlfriend Image
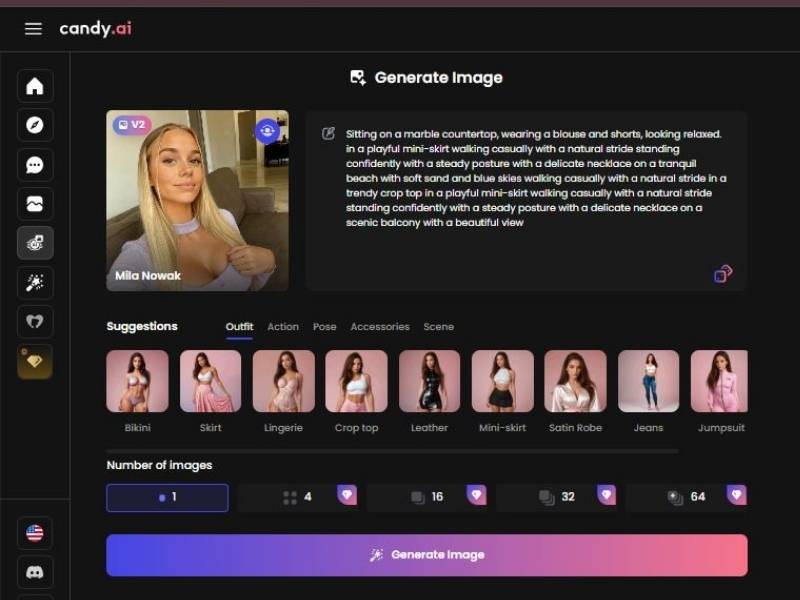
When you open the generator, you’ll land on an image creation screen labeled “Generate Image”. This is where you design your AI girlfriend’s look using a text prompt and quick “suggestion” presets.
- A) Main layout overview
1) Left sidebar (navigation panel)
On the far left is a vertical icon bar with multiple buttons. While the exact names aren’t shown, the structure clearly indicates:
- A top “menu” icon (three horizontal lines) to open/expand navigation.
- A set of feature icons beneath it (likely different generator tools/sections).
- A highlighted/selected icon (gold tone) indicating the current tool section you’re in.
Use this sidebar to move between different areas of the app. If you ever get “lost,” returning to the main generator view is typically done via the most “home-like” icon near the top.
2) Top center page title
- The page header shows “Generate Image” which confirms you’re in image creation mode.
3) Character preview card (left of the main canvas area)
You see a character tile featuring:
- A portrait preview image
- A name label at the bottom (example shown: Mila Nowak)
- A small version tag (e.g., “V2”) near the top of the card, suggesting a model/version selection for the character or generation pipeline.
This card is a quick reference for the current character identity/profile being used.
4) Prompt input (large text box on the right)
A large text field contains a detailed prompt. This is the most important control on the screen-your prompt defines:
- Outfit and styling (e.g., blouse, shorts, mini-skirt)
- Pose and mood (relaxed, confident)
- Scene/background (beach, balcony, scenic view)
- Accessories (necklace)
- Lighting and general vibe (natural stride, tranquil scene)
There is also a small copy icon on the text box (top-left of the prompt field area), implying you can quickly copy the prompt.
At the bottom-right of the prompt area, there’s a small icon button (looks like an edit/utility action). While the exact function isn’t labeled, it likely relates to prompt tools (e.g., expand, reformat, or options).
- B) Using “Suggestions” to quickly shape the character
Below the prompt area is a section labeled “Suggestions” with multiple tabs:
- Outfit
- Action
- Pose
- Accessories
- Scene
These tabs help you build a prompt without writing everything from scratch.
Under the Outfit tab (selected in your screenshot), there’s a horizontal gallery of outfit presets:
- Bikini
- Skirt
- Lingerie
- Crop top
- Leather
- Mini-skirt
- Satin robe
- Jeans
- Jumpsuit
How to use these:
Clicking one of these likely inserts or modifies prompt text to match the chosen style. This is helpful when you want consistent clothing terminology or you’re not sure what to type.
- C) Choose how many images to generate
Near the bottom, there’s a “Number of images” selector with options:
- 1
- 4
- 16
- 32
- 64
Some options show a small diamond icon, which usually indicates a premium feature or higher resource usage tier.
Best practice:
- Start with 1 or 4 while experimenting with prompts.
- Move up to 16+ only when your prompt is dialed in and you want variety to choose from.
- D) Generate your image
At the bottom is a large gradient button:
- “Generate Image”
Clicking it triggers the image creation process using:
- the prompt in the text box,
- the selected suggestion tab/presets (if any),
- and the number-of-images choice.
Tip for better results (prompt writing):
Include these elements clearly:
- Subject description: age range (adult), hair, face vibe, body type (avoid medical claims), style
- Outfit: specific items + color + material
- Pose: standing, leaning, walking, seated, etc.
- Scene: balcony, bedroom, beach, café, city night
- Lighting: golden hour, soft indoor light, neon, etc.
- Camera framing: full body, waist-up, portrait, wide shot
Then generate a small batch (4) and pick the best candidate for video.
Step 2 – Select an Image to Convert Into Video
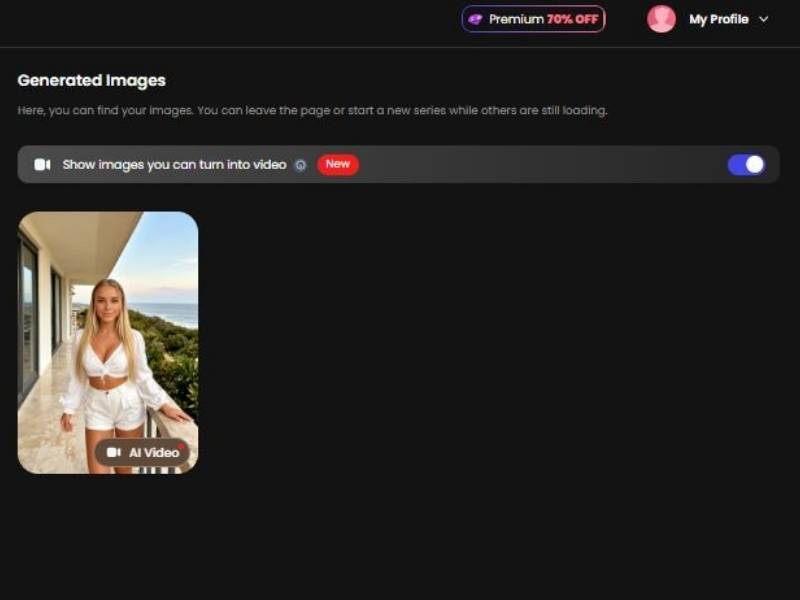
After generation, you move to a gallery page titled “Generated Images”.
- A) Page header and controls
1) “Generated Images” title + description
The page explains you can view your generated content and you don’t need to stay on the page while images are still loading.
2) Top-right account access
- “My Profile” appears at the top right with a dropdown arrow, implying account/settings and possibly billing/history.
3) Premium promotion
- A pill-shaped banner shows “Premium 70% OFF” at the top, indicating subscription upsell or credit discounts.
- B) Filter: show images that can become videos
There’s a toggle row labeled:
- “Show images you can turn into video” with a “New” badge
- A switch on the far right
What it does:
Turning this on likely filters your gallery to only images eligible for animation (some images may not qualify due to generation settings, aspect ratio, content type, or system limits).
- C) Choosing the image tile for video
In the gallery area, you see a generated image tile (portrait format). On the tile, there’s a button:
- “AI Video”
How to proceed:
- Browse your generated images.
- Find the one with the look you want.
- Click “AI Video” on that image tile.
That action opens the video creation panel (Step 3).
Step 3 – Configure Video Settings and Request the Video
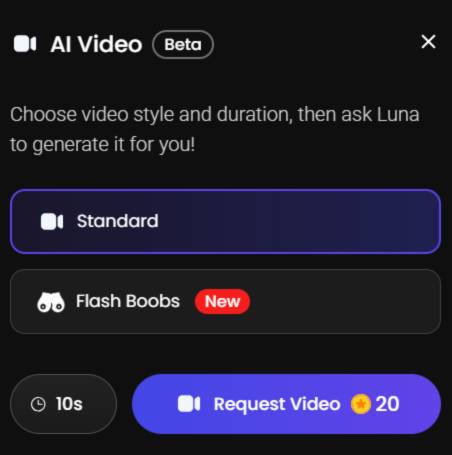
Clicking “AI Video” opens a modal window titled:
- “AI Video” with a “Beta” label
At the top-right is an X button to close the modal.
The modal instructs you to choose a style and duration, then ask Luna (the assistant/system name inside the product) to generate it.
- A) Choose video style
You have two visible style options:
- Standard
- This is the safe/default animation style.
- Recommended for most users and for first attempts.
- “Flash Boobs” (New)
- This appears to be an adult-themed style option.
- If your platform or audience requires safe-for-work content, avoid this option and stay with Standard.
(Note: I’m describing the UI label shown in your screenshot. If you’re publishing a public-facing guide, you may want to include a content warning and clarify that availability may depend on account settings/region.)
- B) Choose video duration
At the bottom-left of the modal is a duration control showing:
- “10s”
This indicates your video will be 10 seconds long (or that 10 seconds is the currently selected duration).
- C) Request the video (credits/cost)
At the bottom center/right is a large button:
- “Request Video”
- A small coin/credit indicator shows “20”
This strongly suggests requesting a video costs 20 credits/tokens.
To generate:
- Select Standard (recommended) or the other available style.
- Confirm duration (10s).
- Click Request Video (cost: 20 credits).
End-to-End Quick Workflow (All 3 Steps)
- Generate Image
- Write/refine your prompt.
- Optionally use Suggestions tabs (Outfit/Action/Pose/Accessories/Scene).
- Select Number of images (start with 4).
- Click Generate Image.
- Pick a Candidate for Video
- Go to Generated Images.
- Enable Show images you can turn into video if needed.
- Find your best image and click AI Video on the tile.
- Create the Video
- In the AI Video (Beta) modal, choose a style.
- Confirm duration (10s).
- Click Request Video (cost shown: 20 credits).
What Candy AI Does Well
Let’s break it down with a table – because I know you skim read like a pro:
| Feature | What It Means | How Users Experience It |
| Text-to-Video | Create video from text prompts | You describe a scene, AI generates a clip |
| Visual Control | Some level of guiding how things look | You can tweak styles, settings, characters |
| Web-Based | No install, runs in browser | Easy access, from anywhere |
| Speed | Generates in minutes | Fast enough to iterate ideas |
| Export Options | Save video files | Download or share externally |
I asked it to make something whimsical – “a robot chef dancing in a kitchen.” It actually delivered movement and personality in the clip. Not flawless, but imaginative.
How It Handles “Edgy” or Adult-Themed Content
Candy AI doesn’t publicly advertise itself as a tool for adult content. Every platform has guardrails to prevent misuse, and this one is careful – it filters or rejects explicit requests. That’s standard in the AI world, and honestly, good practice.
If you try to push it toward adult themes, you’ll hit content moderation. Not because the tool is weak – but because platforms have responsibilities and often legal obligations to block harmful requests.
Here’s a quick sense of that:
| Prompt Type | Likely Outcome |
| Family friendly visuals | Accepted |
| Artistic abstract scenes | Accepted |
| Suggestive adult prompts | Blocked or filtered |
| Explicit content requests | Rejected |
So if your goal is “just generating any video I imagine,” great – you’re set. If your goal is to bypass filters to make explicit adult content, you’ll bump into those safety walls.
How Prompts Work in Candy AI
Think of writing prompts like directing a tiny film crew using plain language. What you type guides:
- Characters
- Action
- Environment
- Tone or style
It rewards specificity. Vague text gives vague results. Want a specific style (cartoon, cinematic, noir)? Tell it.
The trick is in experimentation. Small tweaks yield surprisingly different clips.
What I Like Personally
I’m not kidding – after a few tries, I started thinking of it like brainstorming with a very literal friend. I’d say something weird, it’d spit back an animation that made me chuckle or scratch my head.
It’s playful and unpredictable in a good way. Not perfect – sometimes it misunderstands your vision – but that’s part of the fun.
The interface is simple, borderline inviting. You don’t need a manual that reads like a term paper.
What Could Be Better
No tool is perfect – here’s where it stumbles a bit:
- Resolution limits – not cinema quality yet
- Movement isn’t always smooth – sometimes jerky
- Style consistency over long sequences – can drift
Those aren’t deal breakers, just reality checks.
A Look at Ethical and Practical Considerations
It’s only fair that I note this: generative AI tools are advancing swiftly, but they’re not magic. When it comes to sensitive or adult-oriented material, platforms responsibly constrain what they will generate.
That’s a matter of safety and legality - not to mention respecting the people whose likenesses may be considered.
If you’re doing legitimate creative video generation – weird, arty, cinematic, experimental – Candy AI is worth a spin. It’s a road most reputable services will not take you down if your goal is to evade content policies.
Summary Table – Should You Try Candy AI?
| Criterion | Verdict |
| Ease of Use | High |
| Creativity | Strong |
| Accessibility | Very Accessible |
| Quality | Good for short clips |
| Safety/Filters | Strict where needed |
| Fun Factor | Surprisingly high |