Picture a device that takes the personality you’ve crafted – their look, their vibe, perhaps even the mood you describe – and then translates it into a custom video instead of static images.
That, in essence, is what the not-safe-for-work video generation feature claims it can do: You give it a scenario or prompt, select poses or references and it renders a short animated clip using that input.
The site frames this as one feature in a suite of AI features (you can chat with AIs, generate characters, make pictures) and now step up to move images that follow along with your thoughts.
Mydreamcompanion Video Generator: Detailed user guide
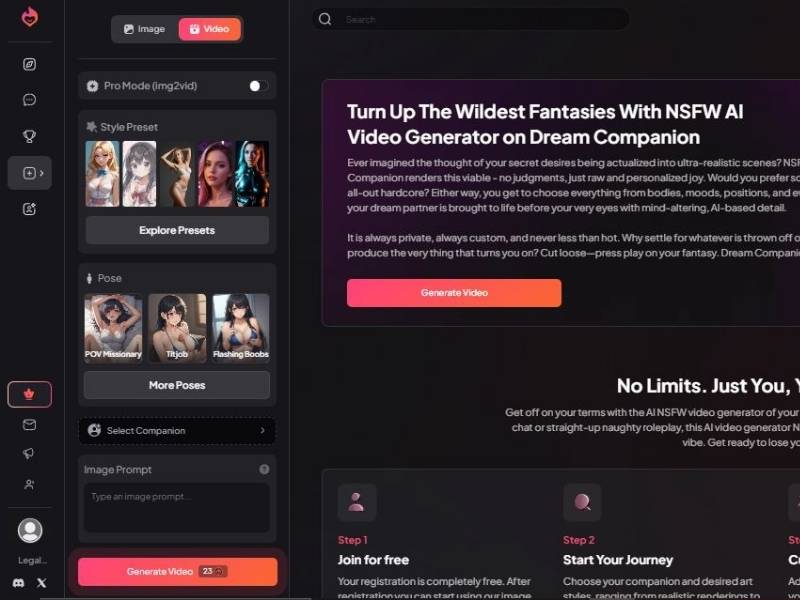
Step 1: Select the Output Type (Image vs. Video)

Before choosing styles or characters, you must decide what the generator will produce.
What the interface shows
- A two-option selector with:
- Image (left) with an image icon
- Video (right) with a clapperboard icon
- The Video option appears highlighted (pink/orange), indicating it is currently selected.
What to do
- Click Video to ensure the tool is configured for animated output rather than a still image.
- Confirm the highlight remains on Video before moving on—this matters because later controls (like the “Video Prompt” field and the “Generate Video” button) are tied to video mode.
Step 2: Configure Rendering Quality and Choose a Style Preset

Once video mode is active, the next decision is how the character should look (art style) and how detailed the render should be.
What the interface shows
- Pro Mode toggle at the top (a switch control).
- It appears labeled with a mode name (e.g., “Pro Mode …”), indicating an enhanced generation setting.
- Style Preset section with several thumbnail presets (female portraits).
- A button labeled Explore Presets, suggesting a larger library of styles is available beyond the initial set.
How to use it correctly
- Decide whether to enable Pro Mode
- Use Pro Mode ON if you want higher detail and more refined output (often slower and/or more resource-intensive).
- Use Pro Mode OFF for quicker iterations while you experiment.
- Select a style preset thumbnail
- This determines the overall aesthetic (e.g., more realistic vs. stylized).
- If none of the visible presets match your goal, click Explore Presets to browse more options.
Best practice: Choose your style before selecting a companion and pose. Changing style later can alter the character’s face and overall appearance significantly.
Step 3: Select a Pose or Body Position

After style is set, you define how the AI girlfriend will be positioned in the scene.
What the interface shows
- A Pose section with multiple pose thumbnails.
- Some pose titles appear adult-themed (explicit labels are visible in the UI).
- A button labeled More Poses, which implies additional pose categories or a larger pose gallery.
What to do
- Choose a pose thumbnail that matches the type of output you want (composition, posture, camera framing).
- If the visible options are limited, select More Poses to expand the available choices.
- Keep your prompt aligned with the pose—if the pose suggests a relaxed posture, write prompts that support that mood rather than contradict it.
Important note: Pose choice strongly influences framing and body alignment. If your output looks “off,” pose mismatch is one of the first things to revisit.
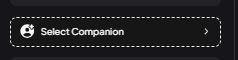
Step 4: Choose the Companion (Your AI Girlfriend Identity)
This is where you select who the generator should render—your companion profile.
What the interface shows
- A large, dashed-outline button labeled Select Companion
- A user icon on the left of the button
- A right-facing arrow on the right, indicating it opens a selection menu or panel
What to do
- Click Select Companion.
- Choose an available companion from the list (the exact list is not shown in the screenshot, but the arrow indicates a picker screen).
- Confirm selection and return to the generator screen.
Why it matters: The companion typically determines consistency—facial identity, general look, and potentially personality-linked styling (depending on how the app is designed).
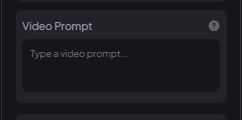
Step 5: Provide the Video Prompt (Scene Instructions)
Now you tell the system what to generate.
What the interface shows
- A text field titled Video Prompt
- Placeholder text: “Type a video prompt…”
- A small question mark (?) icon near the prompt area, suggesting help, guidance, or examples.
How to write effective prompts (without overcomplicating it)
A strong prompt usually includes:
- Character descriptors (hair, outfit, vibe)
- Setting (location, time of day, lighting)
- Mood (confident, playful, calm, cinematic)
- Motion cues (simple, natural movements tend to work best)
Recommended workflow
- Start with a short prompt (one clear concept).
- Generate once.
- Refine based on what you observe (rather than rewriting everything).
If you are unsure what to write, click the (?) icon—interfaces like this typically provide format tips or examples.
Step 6: Generate the Video (Credits/Cost Awareness)
This is the final execution step.
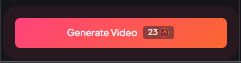
What the interface shows
- A prominent button: Generate Video
- A small badge showing “23” next to it (appears to represent the cost in credits/coins/tokens).
What to do
- Review your configuration:
- Video mode selected
- Style preset chosen (and Pro Mode set as intended)
- Pose chosen
- Companion selected
- Video prompt written
- Click Generate Video.
- Expect the system to deduct 23 units (as displayed) for the generation.
Practical tip: If credits are limited, do quick iterations with simpler prompts (and possibly Pro Mode off) until you find the direction you want—then generate the “final” with your preferred quality settings.
How It Actually Works (In Plain English)
I played with the concept in my head like a daydream – but here’s the more grounded version:
- Create or select your AI character.
This isn’t just picking a stock avatar – the platform lets you customize their appearance and personality ahead of time so videos feel continuous with your earlier creations. - Choose the video mode.
On the interface, there’s a toggle between still image generation and video. You flip it over to the video side before generating. - Set the pose or scene.
You pick an existing frame reference or upload one you like. Think of it like picking the key moment you want the AI to animate around. - Write a prompt or description.
This is where the magic happens – you describe the scenario, mood, background, etc. The better your prompt, the closer the result will be to what you imagined. (Yes, prompt writing becomes a skill.) - Generate & refine.
Once you hit Generate, the AI processes your request and gives you a short video clip. Depending on your credits and settings, you might tweak and try again.
What Users Are Saying (Without Getting Crude)
Because this stuff lives in a gray niche, direct user reviews are sometimes informal. But on forums and blog guides, people report:
- Short clips only right now. They aren’t feature-length scenes yet – think “moment” not “movie.”
- Character continuity matters. If you build a character once and then use it for video, it feels more “personal” than random avatars.
- Prompt engineering = power. The better your description (scene, emotion, setting, pacing), the more the output reflects that.
- Free credits let you test drive. You usually get some amount of free use before deciding on a paid tier.
Strengths & Weaknesses – Not Just Buzzwords
Here’s a straight-up comparison so you can see what it feels like to use to what it actually does:
| Attribute | What It Means in Practice |
| Customization Options | You really can tailor characters and scenarios; this isn’t random stock generation. |
| Video Length | Short clips designed to reflect a single prompt, not long animations. |
| Prompt Sensitivity | You get back what you describe. Sloppy prompts → vague outputs; precise prompts → better results. |
| Credits & Cost | Free trial exists but advanced features use credits or subscription. |
| Privacy | According to third-party reviews, generated content stays private to your account. |
| Realism | Some users say clips can be visually compelling given expectations; others note limitations compared to professional animation. |
Why You Might Actually Want to Try It
You might be thinking, “So is this just another gimmick?” My honest take – and I’m saying this like a friend rather than a press release – is that the appeal here isn’t just adult content, it’s creative agency.
Ever wanted a visual that’s exactly how you imagined something – down to the mood, the lighting, the camera angle? That’s what this promises, including in motion. Whether you’re:
- experimenting with storytelling,
- exploring character design,
- or just curious about where AI can take personalized video creation,
This generator gives you control instead of choosing from a library of premade clips.
Some Friendly Advice Before You Dive In
You know how baking a cake from scratch tastes better than boxed mix? Prompt writing is a bit like that here:
- Be specific about scene details. The AI doesn’t guess emotion well unless you describe it.
- Use references (poses, style names) where you can – that helps the model anchor visuals.
- Try a mix of character + scenario + environment in your prompt rather than just one. It seems to produce richer outputs overall.
And hey – if you find yourself chuckling at some weird outputs, that’s part of the ride.
Final Take (My Personal Opinion)
The MyDreamCompanion NSFW video generator: Is this perfect? Nope. But it’s one of the only tools out there that doesn’t merely produce still images – it tries to animate your imagination.
If you’re the sort who loves to tinker with ideas, go to and beyond limits and see what’s again possible for AI, a test drive is in order.
The ability to push beyond just static visuals into motion, even if it is for a brief second or two, seems intriguing from a tech and artistic perspective.
So if you’re a curious writer who’s willing to play with prompts and not afriad of investing some time in learning to drive a new toy – well worth the dive.